

This is an article originally co-authored by Olyvia Rakshit & I for the Avesha blog. You can find it by following this link.
What is Multi-tenancy in Kubernetes?
Multi-tenancy in Kubernetes is a way to deploy multiple workloads in a shared cluster with isolated network traffic, resources, user access, and last but not least control plane access. Such tenancy is needed
- by SaaS providers for their customers who orchestrate containers using Kubernetes,
- by teams in an enterprise who have different functions or
- by applications which have specific compliance or performance requirements.
Similar to virtualization in the compute world, multi-tenancy in Kubernetes is a form of virtual cluster on a physical cluster.
Or to look at it from a different perspective, multi-tenancy in Kubernetes is very similar to multiple tenants in real estate such as in an apartment complex or shared office centers.
The use case for multi-tenancy
When we talk about multi-tenancy in the real world, it is not difficult to picture why it is required. Let’s take the example of an apartment complex where several isolated apartments are leased out to several customers sharing the same resources. Contrast this with a single family purchasing the same real estate and building a single house.
More individuals and families can be accommodated within a complex. An equitable sharing of resources like electricity, water etc in an isolated manner can be achieved among people living in different apartments. In case of a single tenant building a house on the same plot of land, there’d be limited sharing capabilities – whether it be in the case of real estate or resources. Therefore from the perspective of making a profit during a sale and ensuring efficient occupancy, it can be argued the first option is definitely better.
In the case of application deployments, going by the analogy above, it’s always efficient to pack multiple tenants in the same infrastructure.
Moving over to the Kubernetes world, due to efficiencies gained by Kubernetes, organizations are rapidly transitioning their application architectures from monoliths to microservices.. Kubernetes clusters, with release 1.24, can have upto 5000 nodes, 110 pods per node, and 150000 total pods.
With multiple teams needing to have a dedicated cluster or set of clusters, platform teams managing the clusters have to deal with increased costs of running a farm of clusters, copies of tooling associated with operating clusters, and optimizing unused capacity in clusters. Add to it the fact that the Kubernetes control plane (master node) is required to scale horizontally along with the increase in workloads and we know why having multiple tenants or “multi-tenancy” would make more sense in the context of Kubernetes clusters.
Benefits of a multi-tenant approach
Multi-tenancy in Kubernetes helps bring cost savings by reducing the footprint of the control plane and by optimizing node capacity across multiple teams or multiple customers. It can be achieved by either using a shared node pool across teams (compute is cheaper at scale) or dedicating some set of nodes to a tenant when needed. If you consider an on-prem deployment, dedicating servers to a tenant will increase costs and will not take optimal advantage of the Kubernetes scheduler bin packing algorithm for optimal workload placement.
Multi-tenancy also brings operational cost savings by consolidating different tools sets for managing, visibility and operating clusters. Optimizing a single cluster is complex. If one deploys a cluster per tenant, operating and optimizing will be difficult and increases the operational burden by many folds.
Multi-tenancy helps spin up new customers or new teams instantly and easily along with the associated tooling. This means you don’t have to bring all new infrastructure for each tenant! It also helps reduce complexity of configuration maintenance and security validation for multiple clusters.
In summary by implementing multi-tenancy in Kubernetes clusters you gain:
- Cost savings
- Reduce operational overhead
- Improves continuous delivery at scale
Enter KubeSlice!
‘KubeSlice’ combines network, application, and deployment services in a framework to create tenancy in a Kubernetes cluster and extends it to multi-cluster.
KubeSlice creates logical application boundaries known as “slices” that allow pods and services to communicate seamlessly across clusters, clouds, edges, and data centers regardless of their physical location. Each slice is assigned its own set of namespaces, resource quotas, traffic profiles that creates an “isolated virtual network” for each tenant (a team or a customer) in a single cluster or multiple clusters.
KubeSlice drives provisioning and management of tenants via a Controller which is isolated functionally from workloads deployed by product teams via a worker cluster. As Kubernetes defines a control plane for orchestrating containers in worker nodes, KubeSlice’s control plane is defined as ‘Controller’.
KubeSlice in action
Installing KubeSlice on any distribution of Kubernetes is done via Helm charts. Tenancy driven by KubeSlice can be attained in a few simple steps after the initial installation of the ‘Controller’ subsystem.
KubeSlice is divided into two components: A control cluster and a group of worker clusters. The control cluster is the control plane managing worker clusters either in public clouds (multi cloud support) or clusters on-prem. The controllers job is to manage tenancy creation, establishment of isolation, creation of overlay network across worker clusters for a tenant, RBAC functionality for a tenant, resource allocation to a tenant and much more.
Steps for Establishing Tenancy
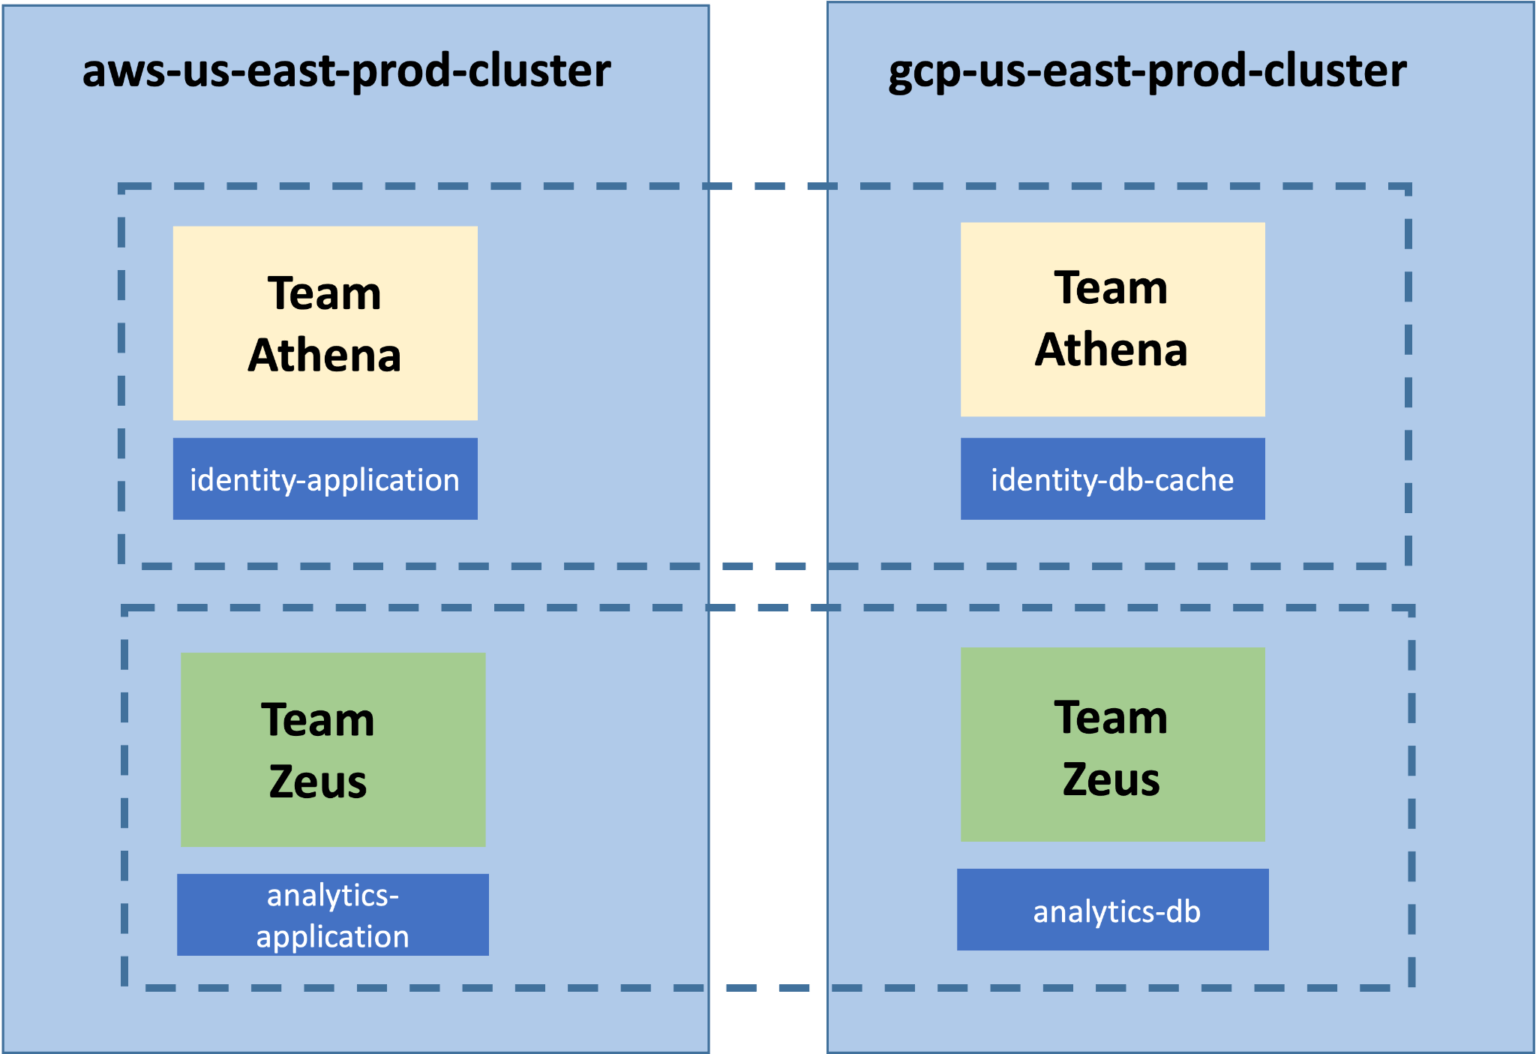
A multi-cluster multi-tenant model showing Team Athena Slice and Team Zeus Slice
1) Register cluster or set of clusters
This step defines Kubernetes clusters to be managed by Controller for creation of tenancy / Isolation for teams or customers.
First step is to register the clusters with the Controller.
—------
Cluster 1: aws-us-east-prod-cluster
—-------
apiVersion: controller.kubeslice.io/v1alpha1
kind: Cluster
metadata:

name: aws-us-east-prod-cluster
namespace: kubeslice-acme
spec:
networkInterface: eth0
clusterProperty:
telemetry:
enabled: true
telemetryProvider: "prometheus"
endpoint: "http://30.2.44.110:32700" ## For example: "http://extrenal IP:32700"
geoLocation:
cloudProvider: "AWS"
cloudRegion: "us-east-1a"
—-----
Cluster 2: gcp-us-east-prod-cluster
—-------
apiVersion: controller.kubeslice.io/v1alpha1
kind: Cluster
metadata:
name: gcp-us-east-prod-cluster
namespace: kubeslice-acme
spec:
networkInterface: eth0
clusterProperty:
telemetry:
enabled: true
telemetryProvider: "prometheus"
endpoint: "http://25.4.32.210:32700" ## For example: "http://extrenal IP:32700"
geoLocation:
cloudProvider: "GCP"
cloudRegion: "us-east"
Command Execution
kubectl apply -f <cluster registration>.yaml -n kubeslice-<project namespace>
2) Install KubeSlice operator in above registered clusters
Edit below YAML file with information
## Base64 encoded secret values from controller cluster
controllerSecret:
namespace: <namespace>
endpoint: base64 value of the <controller endpoint>
ca.crt: <ca-cert>

token: <token>
cluster:
name: <worker cluster>
endpoint: <endpoint of control plane of the worker cluster>
# Provide your username, password & email values under imagePullSecrets to create a
secret
imagePullSecrets:
repository: https://index.docker.io/v1/
username: <username>
password: <accesstoken of the user>
email: <email ID>
Command Execution
helm install kubeslice-worker kubeslice/kubeslice-worker -f <values>.yaml --
namespace kubeslice-system --create-namespace
3) Install Slice on the two clusters
After registering the cluster or a set of clusters by following the step above, one is ready to create a slice on a cluster or a set of clusters. By adding more than one cluster KubeSlice will automatically establish connectivity across clusters.
The YAML file below helps to create two tenants for two teams in the clusters registered. The teams ‘Team Athena’ & ‘Team Zeus’ will share the clusters in AWS and GCP.
—-----
Slice 1: team-athena
—-------
apiVersion: controller.kubeslice.io/v1alpha1
kind: SliceConfig
metadata:
name: team-athena
namespace: kubeslice-acme
spec:
sliceSubnet: “192.168.0.0/16”
sliceType: Application
sliceGatewayProvider:
sliceGatewayType: OpenVPN
sliceCaType: Local
sliceIpamType: Local
clusters:

- aws-us-east-prod-cluster
- gcp-us-east-prod-cluster
qosProfileDetails:
queueType: HTB
priority: 1 #keep integer values from 0 to 3
tcType: BANDWIDTH_CONTROL
bandwidthCeilingKbps: 5120
bandwidthGuaranteedKbps: 2560
dscpClass: AF11
namespaceIsolationProfile:
applicationNamespaces:
- namespace: identity-application
- namespace: identity-db-cache
clusters:
- '*'
isolationEnabled: true #make this true in case you want to enable isolation
allowedNamespaces:
- namespace: kube-system
clusters:
- '*'
A second slice for a different team who needs infrastructure but would like to not have any linkage with teams in the same organization. A cost effective way of sharing resources and still maintaining strict isolation from network, access, and resources can be achieved by creating a slice (tenant) on the same clusters.
—-----
Slice 2: team-zeus
—-------
apiVersion: controller.kubeslice.io/v1alpha1
kind: SliceConfig
metadata:
name: team-zeus
namespace: kubeslice-acme
spec:
sliceSubnet: “192.168.0.0/16”
sliceType: Application
sliceGatewayProvider:
sliceGatewayType: OpenVPN
sliceCaType: Local
sliceIpamType: Local
clusters:
- aws-us-east-prod-cluster

- gcp-us-east-prod-cluster
qosProfileDetails:
queueType: HTB
priority: 2 #keep integer values from 0 to 3
tcType: BANDWIDTH_CONTROL
bandwidthCeilingKbps: 5120
bandwidthGuaranteedKbps: 2560
dscpClass: AF11
namespaceIsolationProfile:
applicationNamespaces:
- namespace: analytics-application
- namespace: analytics-db
clusters:
- '*'
isolationEnabled: true #make this true in case you want to enable isolation
allowedNamespaces:
- namespace: kube-system
clusters:
- '*'
With the actions above, we have created TWO TENANTS (team-athena, team-zeus) across TWO CLUSTERS based on two different cloud providers. (aws-us-east-prod-clust, gcp-us-east-prod-cluster)
We’d love for you to try out KubeSlice and provide us feedback! If you run into any issues, we hang out in the #kubeslice channel on the Kubernetes slack. To keep up with the latest updates on KubeSlice, follow us on Twitter and Reddit.